The steps to take to put the device into operation are as follows:
1- Activation of the device. The positioning service provided requires an active subscription. You can access the different Subscription options here.
During the subscription process you will be asked for the IMEI of the device, which is usually located on the back of the device. This way we make sure to activate your device and not another.
The device activation process on mobile networks in your country usually takes no more than 20-30 minutes, but in certain cases, depending on mobile networks and country, it can take up to 2 hours. Do not worry
2.-Download and install the “findPet” App on your Android or iOS mobile phone
3.- In the app, after accessing with your username and password, click on “Add device” the first time you access, and enter the data requested, among which the IMEI is requested again. The app can read the barcode to make your job easier.
4.- Turn on the device. Press the central button of the device for a few seconds until the power-up music is heard. While on, a blue light flashes when the button is lightly pressed.
The activation process ends with the acquisition of the first GPS (satellite) signal. To make the process faster, it is convenient to place the device outside any building. Until the first location is obtained, “waiting for GPS signal” will be displayed on the App.
normal use
Turning on the device – Press the central button of the device for a few seconds until the power-up music is heard. While on, a blue light flashes when the button is lightly pressed.
Make sure the device has enough battery power before power on. If it doesn’t turn on, you may need to charge the battery.
Device shutdown – Device shutdown can be done from the App, configuration section (M4), Power off button (C5)
Know the location of the pet immediately – Use the “Live” button (A1) on the map, both with normal click (instant location) and long click (Live for 1 minute)
Device charging – battery life may change depending on usage conditions, time interval, mobile network coverage, etc. It usually lasts between 3 and 5 days. To charge it, use the supplied cable connecting it to a charger with a USB type connector, and to the GPS charging port. Charging takes about 2 hours. Once loaded, make sure to close the silicone door to avoid dirt and water.
Change the interval between locations – Access the configuration menu (M4), time interval selector (C8). Please note that the selection will affect the battery life of the GPS
Setting up a virtual fence – Setting up a virtual fence with notifications requires two steps:
1- Establishment of the fence. Use button A2 from the map menu (M1) and follow the steps indicated. The fence can be round or polygonal.
2- Establishment of notifications. If you want to be notified by notifications to your mobile when your pet enters or leaves the marked area, make sure you have notifications activated in the configuration menu (M4), notifications dropdown (C10). In addition, you should check that the tone/vibration associated with notifications from the “findPet” App is configured on your mobile phone.
App operation
Main menu
These options will appear in all sections
M1 – map
M2 – activity
M3 – events
M4 – configuration
M5 – info
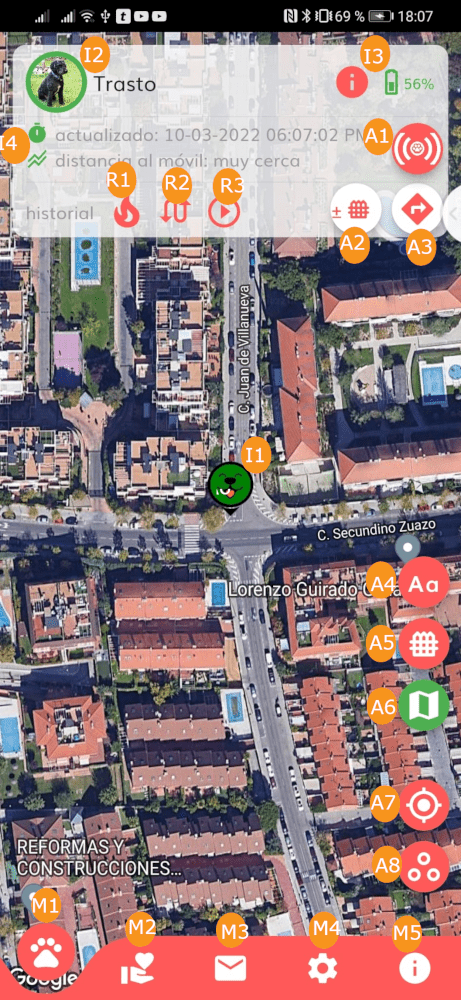
Menu – Map (M1)
Information displayed:
I1 – show the location of the device on the map
I2 – image or photo, and name of the pet. Click to change. Green or red circle depending on online or offline status
I3 – click for more detailed information about the device: subscription status, coordinates, satellites, etc. battery status
I4 – shows the time of the last update
Reports:
In the reports, after clicking you must select the date or date range of the report
R1 – report in heatmap mode. android only
R2 – route report on the map
R3 – moving route report, “Play” mode
Action Buttons.
The map supports standard controls like finger zoom, scroll, etc.
A1 – NORMAL CLICK – Instant location. Shows the location of the device (with a delay of approx. 10 seconds), as long as it is online
A1 – CLICK 2 SECONDS. “LIVE” mode for 1 minute. Locations every 5-10 seconds. After this time, the device returns to its interval between locations determined in the configuration section (M4, selector C8)
A2 – add and/or remove virtual fences
A3 – open Google Maps to be guided to the location of the device
A4 – shows (on/off) on the screen, in the pet position marker (I1), the name of the pet
A5 – shows (on/off) the pet’s virtual fences on the map. If there are no virtual fences set, it shows nothing
A6 – change the map mode. Switch between satellite mode (default) and “Google Maps” mode
A7 – center the map on the location of the mobile phone
A8 – center the map on the location of the device. If there are multiple devices, show them all
Menu – Activity (M2)
This section shows the Activity of the pet, measured in distance, steps, and activity time.
You can scroll the time bars and maps horizontally to select other displays
Menu – Events (M3)
In the events section you can see the device events of the last days. If an event includes a position, for example entering or exiting a virtual fence, you can click on it to show it on the map.
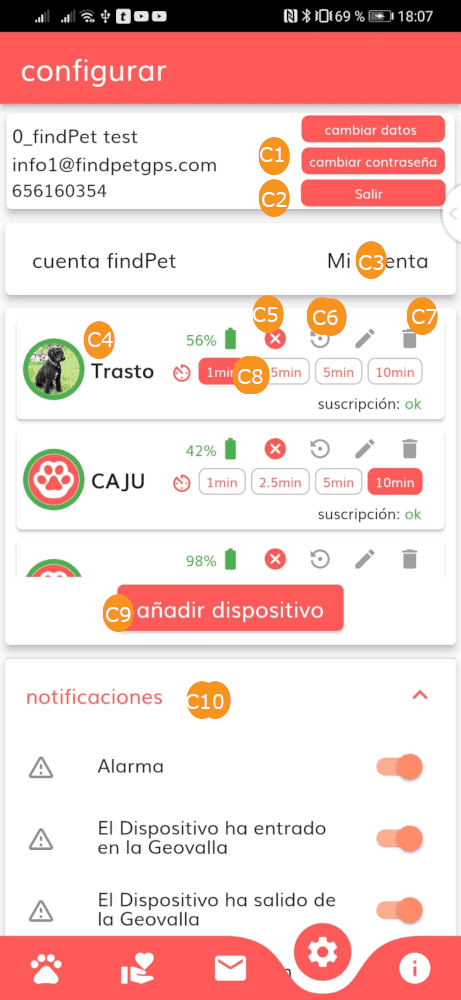
Menu – Settings (M4)
C1 – change data / change password. The password change is done by sending an email to your email address to prove your identity, and affects both access to the App and access to “my account”
C2 – App Logout
C3 – “My account”. Direct access to the web section of “my account”, where you can see the complete status of your subscriptions and orders, modify them, etc. It requires the same username and password that are used for the App. If you don’t remember, you can reset your password on the C1 button
C4 – change image or take a photo, and name of the pet.
C5 – Device shutdown (as long as it is online). The ignition cannot be done from the App, it must be done from the main button of the device
C6 – Device reset
C7- Erasing the device. ATTENTION, all location history of your pet will be permanently lost.
C8 – Selection of the interval between locations. This is the time it takes for the device to send its location normally. By default it is set to 5 minutes. Shorter period means better accuracy, but battery life will be compromised.
C9 – Window to add a device. It is mandatory to do it when starting the Application after the subscription. You can add multiple devices to the App, each device needs your subscription.
C10 – Selection of the notifications that will be sent to the phone.
Press to display, and all the possible notifications that you can receive on your mobile phone will appear:
Alarm. Low battery alarm (recommended)
The device has entered a virtual fence (recommended)
Device has exited a virtual fence (recommended)
device online
offline device
The tone and/or vibration you will receive will depend on the general tone/vibration settings on your mobile phone.
Menu – Info (M5)
In this menu you can check:
User Instructions
Terms and Conditions
Privacy Policy
You can also contact us by:
web form
WhatsApp (text and picture messages only)
We use cookies to ensure that we give you the best experience on our website. If you continue to use this site, we will assume that you agree with it.


 In this menu you can check:

